우리가 스마트폰을 하다보면 어떤 창을 클릭을 했을때 (로그인, 회원가입,경고, 팝업) 등 굉장히 다양한 다이얼로그에 대해서 통일성 있게 사용이 되는 것을 확인할 수 있습니다.
한가지의 예시로 회원가입을 하였을때 (아이디가 유효x, 비밀번호 유효x, 필수란에 체크x,중복아이디) 등 굉장히 많은 것에 대해서 우리는 다이얼로그가 뜨는 것을 확인할 수 있습니다.
다이얼로그에 대해서 어떻게 컨트롤하고 어떻게 파일을 분류를하는지 저의 개인적인 의견에 대해서 정리하도록 하겠습니다.
우선 저의 파일 관리는 이러한 다이얼로그는 통일성이 있게
예시로
ErrorDialog , LoadingDialog, DeleteDialog 의 등등의 형식으로 사용을 하게 됩니다.
파일은 따로 util이라는 폴더를 만들어 따로 관리하는 편의 형식을 선호합니다. (util 폴더에 들어가는 다른 예시로는 시간환산,이미지변환 등에 대한 util을 따로 모아둡니다.)
에러시 다이얼로그 처리
ErrorDialog.kt
import android.app.Dialog
import android.content.Context
import android.graphics.drawable.ColorDrawable
import android.os.Bundle
import android.view.Window
import com.example.helgather.databinding.DialogLoadingBinding

class LoadingDialog(context: Context) : Dialog(context) {
    private lateinit var binding: DialogLoadingBinding
    override fun onCreate(savedInstanceState: Bundle?) {
        super.onCreate(savedInstanceState)
        requestWindowFeature(Window.FEATURE_NO_TITLE)
        binding = DialogLoadingBinding.inflate(layoutInflater)
        setContentView(binding.root)
        setCanceledOnTouchOutside(false)
        setCancelable(false)
        window!!.setBackgroundDrawable(ColorDrawable())
        window!!.setDimAmount(0.2f)
    }

    override fun show() {
        if(!this.isShowing) super.show()
    }
}
우선 위의 코드를 보시게 되면
setCancelable(false) // false -> 화면 밖 터치 맊기 위함다이얼로그의 확인버튼을 눌러야 창이 사라지게 즉, 사용자가 확인을 했다는 의미로 클릭을 하였을때 다이얼로그가 사라지도록 설정을 해두었습니다.
binding.tvErrorDialogCheck.setOnClickListener {
    dismiss()
}
message와 errorMessage를 sharedPreferences를 사용하여 따로 액티비티나 프래그먼트에서 문제가 발생할때
sharedpreferences에 errormessage와 errorType에 대해서 넣어주며 다이얼로그를 띄워주게 설정을 하였습니다.
error_dialog.xml
<?xml version="1.0" encoding="utf-8"?>
<androidx.constraintlayout.widget.ConstraintLayout xmlns:android="http://schemas.android.com/apk/res/android"
    xmlns:app="http://schemas.android.com/apk/res-auto"
    xmlns:tools="http://schemas.android.com/tools"
    android:layout_width="match_parent"
    android:layout_height="wrap_content">

    <TextView
        android:id="@+id/tv_errorDialog_check"
        android:layout_width="wrap_content"
        android:layout_height="wrap_content"
        android:layout_marginTop="20dp"
        android:layout_marginBottom="30dp"
        android:text="확인"
        android:textColor="@color/app_color"
        android:textSize="30sp"
        android:textStyle="bold"
        app:layout_constraintBottom_toBottomOf="parent"
        app:layout_constraintEnd_toEndOf="parent"
        app:layout_constraintStart_toStartOf="parent"
        app:layout_constraintTop_toBottomOf="@+id/tv_errorDialog_reason" />

    <TextView
        android:id="@+id/tv_errorDialog_title"
        android:layout_width="wrap_content"
        android:layout_height="wrap_content"
        android:layout_marginTop="20dp"
        android:text="회원가입 오류"
        android:textColor="@color/black"
        android:textSize="20sp"
        android:textStyle="bold"
        app:layout_constraintEnd_toEndOf="parent"
        app:layout_constraintStart_toStartOf="parent"
        app:layout_constraintTop_toTopOf="parent" />

    <TextView
        android:id="@+id/tv_errorDialog_reason"
        android:layout_width="wrap_content"
        android:layout_height="wrap_content"
        android:layout_marginStart="50dp"
        android:layout_marginTop="20dp"
        android:layout_marginEnd="50dp"
        android:text="TextView"
        android:textColor="@color/black"
        android:textSize="16sp"
        android:textStyle="bold"
        app:layout_constraintEnd_toEndOf="parent"
        app:layout_constraintStart_toStartOf="parent"
        app:layout_constraintTop_toBottomOf="@+id/tv_errorDialog_title" />
</androidx.constraintlayout.widget.ConstraintLayout>
액티비티(프래그먼트)에서의 활용
//에러다이얼로그를 보여주는 함수로 설정하였습니다
//이렇게 함수를 설정한 이유는만약 안드로이드에서 로그인과 회원가입에서 유효하지 않은것에 대해서
//클라이언트에서 미리 처리를 할 수 있기 때문에 적재적소에 활용을 하려고 설정하였습니다.
private fun errorDialogStep(message : String){
    val sharedPref = sSharedPreferences.edit()
    sharedPref.putString("errorType","로그인 오류")
    sharedPref.putString("errorMessage",message)
    sharedPref.apply()
    ErrorDialog(this).show()
}
binding.btnSignUpDone.setOnClickListener {
name = binding.edtSignUpName.text.toString()
phoneNumber = binding.edtSignUpPhone.text.toString()
nickname = binding.edtSignUpNickName.text.toString()
password = binding.edtSignUpPassword.text.toString()
passwordTwice = binding.edtSignUpPasswordTwice.text.toString()
birthDate = binding.tvSignUpBirth.text.toString()
if(birthDate.isNotEmpty()){
birthYear = birthDate.substring(0, 4).toInt()
birthMonth = birthDate.substring(5,7).toInt()
birthDay = birthDate.substring(8,10).toInt()
}
val passwordCheck = binding.edtSignUpPassword.text.toString()
if(!isValidBirthDate(birthDate)) {
errorDialogStep("올바른 생년월일 형식을 확인하고\n 생년월일이 유효한지 확인해주세요.")
binding.tvSignUpBirth.text= ""
}else if(!passwordCheck.matches(passwordPattern)){
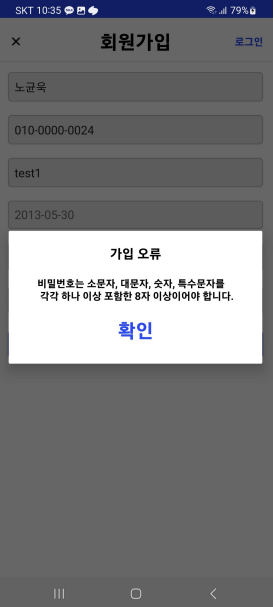
errorDialogStep("비밀번호는 소문자, 대문자, 숫자, 특수문자를\n 각각 하나 이상 포함한 8자 이상이어야 합니다.")
}else if(!isPhoneNumberValid(phoneNumber)){
errorDialogStep("올바른 전화번호 형식을 입력해주세요.")
}else if (password != passwordTwice){
errorDialogStep(("패스워드가 일치하지 않습니다."))
}else{ //클라이언트 딴에서 처리를 하고 이제 가입 통신을 함
val signUpRequest = PostSignUpRequest(name,phoneNumber,nickname,password,birthYear,birthMonth,birthDay)
Log.d("signUptest","$name $phoneNumber $nickname $password $birthYear $birthMonth $birthDay")
LoginService(this@SignUpActivity).tryPostSignUp(signUpRequest)
}
}
위에서 만든 함수와 더불어 이렇게 클라이언트 딴에서 서버와의 통신을 줄이기 위에 미리 설정을 할 수 있습니다.
클라이언트에서 처리를 할 수 있는 부분에 대해서 처리를 하고 충족을 한다면 tryPostSignUp을 통해 서버와의 통신을 진행하게 됩니다.
아래는 부가적으로 서버와의 통신을 하였을때에 대한 처리입니다(+생명주기)
override fun onPostSignUpSuccess(response: PostSignUpResponse) {
    if(response.code == 200){
        showToastMessage("회원가입 성공!")
        val intent = Intent(this@SignUpActivity, SignUpProfileActivity::class.java)
        intent.putExtra("nickname", response.postSignUpResult?.nickname)
        intent.putExtra("memberId",response.postSignUpResult?.id)
        startActivity(intent)
        finish() //왜냐 액티비티에서 전달할때 finish하지 않앗기 때문에 로그인 창이 다시 onResume이 됨.
    }
    else{
        errorDialogStep(response.message.toString())
    }
}
서버와의 통신이 성공하였을때는 정산적으로 진행을 하게 됩니다.
하지만 실패를 하였을때에 대해서는 서버에서 받아온 response에 대한 message를 출력을 아래의 사진처럼 나오게 됩니다.
이렇게 간단한 실습을 진행해봤습니다. (물론 디자인은 개개인의 스타일에 따라 수정을 하시면 될 것 같습니다.)
다음 다른 다이얼로그를 보시겠습니다.
로딩다이얼로그
다음은 로딩 다이얼로그로 서버와의 통신을 진행을 할때 바로바로 통신이 되는것이 아닌 시간이 걸립니다.
그것에 대해서 사용자는 지금 통신을 하고 있는 것인지 아니면 앱이 먹통인것인지 아니면 유효한곳이 아닌지 판가름 할 수 없습니다.
그것에 대해서 서버와의 통신중이라면 로딩을 띄워줌으로써 조금은 사용자의 사용만족도를 높힐수 있지 않을까 생각합니다.
// https://github.com/ybq/Android-SpinKit
implementation 'com.github.ybq:Android-SpinKit:1.4.0'
우선 로딩을 사용하기 위한 spinkit을 사용하였고 build.gradle에 의존성을 투입합시다.
(주석에 달린 사이트를 들어가 최신버전을 넣어주시길 바랍니다.)
LoadingDialog.kt
import android.app.Dialog
import android.content.Context
import android.graphics.drawable.ColorDrawable
import android.os.Bundle
import android.view.Window
import com.example.helgather.databinding.DialogLoadingBinding

class LoadingDialog(context: Context) : Dialog(context) {
    private lateinit var binding: DialogLoadingBinding
    override fun onCreate(savedInstanceState: Bundle?) {
        super.onCreate(savedInstanceState)
        requestWindowFeature(Window.FEATURE_NO_TITLE)
        binding = DialogLoadingBinding.inflate(layoutInflater)
        setContentView(binding.root)
        setCanceledOnTouchOutside(false)
        setCancelable(false)
        window!!.setBackgroundDrawable(ColorDrawable())
        window!!.setDimAmount(0.2f)
    }

    override fun show() {
        if(!this.isShowing) super.show()
    }
}
dialog_loading.kt
<com.github.ybq.android.spinkit.SpinKitView xmlns:android="http://schemas.android.com/apk/res/android"
    xmlns:app="http://schemas.android.com/apk/res-auto"
    android:id="@+id/progressBar"
    style="@style/SpinKitView.Circle"
    android:layout_gravity="center"
    android:maxWidth="65dip"
    android:maxHeight="65dip"
    android:minWidth="65dip"
    android:minHeight="65dip"
    app:SpinKit_Color="@color/app_brighter_color" />
예제는 간단합니다.
우리가 서버와의 통신을 진행하려 할때
통신을 시작하는 부분 바로 하단에
로딩 다이얼로그를 보여주는것에 대해서 추가를 해주고
서버와의 통신이 success과 failure부분에 사라지게 설정을 한다면 그것으로 끝입니다.
이상으로 커스텀다이얼로그에 대한 기본적인 실습을 마치겠습니다. 감사합니다 :)
'Android & Kotlin > Android' 카테고리의 다른 글
| [Android kotlin] 안드로이드 Flow vs LiveData (0) | 2024.01.02 |
|---|---|
| [Android kotlin] 네트워크 메니저로 사용자 경험 개선하기 (Connectivity Manager) (1) | 2024.01.02 |
| [안드로이드 코틀린] 리사이클러뷰 뷰타입에 따른 설정 (실습 : 채팅방) (0) | 2023.05.13 |
| [안드로이드 코틀린] 바텀네비게이션 프래그먼트 전환시 상태 유지 (0) | 2023.05.09 |
| [코틀린] 안드로이드 리사이클러뷰 특정뷰(아이템) 클릭 (0) | 2022.12.29 |


댓글